Showing posts with label ♥ Nail Art ♥. Show all posts

Tuesday, 20 September 2011

Girly Lacey Nails

I'm soooo sorry....〉__〈
It's been a long time since I last
did a nail art tutorial...
It's all because of the activities and assignments
in my college...
First semester is always hard to adjust...
=p


So, today I'm gonna do a lace-look-like nail art...
This is a really simple one...
I did not really go and make everything
really perfect...
Instead, I go for a more casual way in drawing it...


You will need
- Base Coat
- Dotting Tools
- Black and white nail polish
- A nail polish of your choice
- Top Coat


First of all,
apply your base coat
to protect your real nails...=)


Then, make a french tip
with a colour of your choice...
After letting it dry,
draw a line under the french tip like so...
You can choose to use either black or white for the line
or you can even choose another contrast colour for it...
In my case, I used a thin brush to draw this
but feel free to use dotting tool to create the line...
Then, draw a semi cloud shape above the line...
Under the line you also can dot a few dots
to make the nails look cuter...
I know it dont look really nice now
but after decorating, it will be much better...
=)
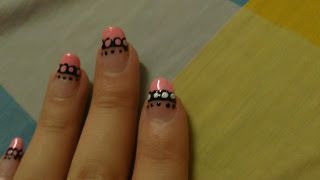
Dot a few white dots on the cloud part like
the photo above...
This is to make your colour pop later...
Then dot the same colour you used on the french tip
on the white dots...
Apply top coat and you are done!! ♥
This is how it suppose to look like...
*Ignore the messy part please*


It is a really simple yet cute nail art...
You should really try it out!! =D


Sorry for not having time to do more nail arts...
But I promise I will do nails if I have time!!
T__T

Saturday, 30 April 2011

Purple Gradient

This is what I did a while ago
but I never did a proper tutorial for this..
So here it is!!
=D

This gradient nails make short nails
appear more attractive ...
Since I had a few broken nails,
so I decide to cut it all short...
But then I regretted
cuz short nails are really hard to do nail art...
(/___\)
Then "Gradient nails" come across my mind!!
=D
Life Saver~♥

Now, we start of with applying base coat
to protect our nails...
Then apply a THIN layer of purple polish
on your nails...
You would need a REALLY THIN one...
So that you can build up the colour later...

After that,
apply another layer start from half of your nails...
Like so
Can you see how the colour built??
Sorry for the bad lighting... =(

Next,
apply the third layer on the tip of your nails...
See how the colour goes??
=)

Let dry completely before
you apply the last layer of nail polish
which is a silver glitter ...
Lastly,
apply top coat and
you're done!
=D

Hope you guys enjoy this...
See you next time...
=)

Wednesday, 27 April 2011

Meow~ nails

It's been so long since I last did my nails...
( 〉_〈 )
Not that I'm lazy...
It is because of my nails are not being in condition...
I don't know why,
they keep fall of layers of nails...
I mean LAYERS and LAYERS!!
That force me to cut my nail shorter
so that I won't have a chance to chipped or whatsoever...

Okay!!
Enough of the grandmother's story...
Let's start!!
=)

Like usual,
start off by applying base coat to your nails...
It is to protect your nails...
Especially when you are using black nail polishes...

Then,
Do a french tip like so...
I used hot pink...
Feel free to change the colour....
=)

For all the nails except the thumb's,
draw paw prints randomly...
Dotting tools are great helpers!! =D
Seal it with top coat and
we'll move on to the thumb...
I know these look kinda messy...
Forgive me~~
I was experimenting~
(/___\)

For the thumb,
we will draw a cat...
We'll start with a semi circle
somewhere near the french tip...
Then we'll have the legs and the ears done...
Let's not forget about the tail...
You can do it any shape you want...
It can be a spiral or whatever...
As long as you like it...=)

Take white polish for eyes, nose and inner ears...
We'd need white is to let the colour of the nose
and the inner ear pop out...
After that, just dot some colour for the nose and the inner ear...
It is better to be a bright colour...
You don't want your cat to look so fierce right?
LOL~
Then, add black dot to create iris for the cat...
This is the best I can do with Paint...
I really hope you guys understand
what I'm trying to explain...
(/___\)

Last but not least,
add TOP COAT
to seal in your design!!

TADA~
My cute little meow meow~
(^_^)

Up next is tutorial of gradient nails...
Stay tuned!! ♥

Friday, 8 April 2011

Strawberry nails ♥

Well,
I bought some nails polishes
and that's how the strawberry
was eaten...
Oops... It should be "painted"...=p
They just look so YUMMY ...
LOL~!

Stuff you need
- strawberry red nail polish
(with coral pigment)
- light green nail polish
- white nail polish
- base coat
- top coat
- dotting tool
- a piece of paper

So, to start of,
apply a layer of base coat...
It helps to protect your nails...
Choose a base coat which have
a nail hardener function...

After that,
apply your RED nail polish...
Don't worry about having your polish
out of your nails...
You can clean it up later...
=)

Then,
add in the GREEN leave....
I just paint the three leaves randomly ...
But if you wanna go for a neater edge and shape,
you could use a thin brush to create it...
Since I don't have one,
I thought I should just do it like that...
(They look like tomatoes now,
don't you think so?? xDD)

You can apply a sheer of glitter on your green polish
to make it stands out....
I don't use glitter because my green is a bit pearly...
It already kinda catch my eyes...
=)

Now, take a piece of paper,
and put some white nail polish on it...
Use your dotting tool to take the white polish
and start creating dots on your nails...
I dotted 3 dots on each finger...
I thought it would be cuter that way...
Feel free to have more dots!!
=D

Now, after the nails dry,
apply a layer of top coat to seal in the pattern...
Clean up the excess of the nail polish
and
YOU ARE DONE!! ♥


Stay tuned for more nail art !!
XOXO

Friday, 1 April 2011

Simple french nail tutorial

As I said in the last post,
I had a new nail art for myself...
So,
I'm gonna show you all how to do
a simple yet elegant french nail ...
=)

First,
apply base coat to protect your nails...
(OR you can skip this part)

Then,
apply nail polish of your choice...
I choose two different colour...
Hot pink and soft pink
The nail polish contains a little bit of glitter inside...
So it won't make your nails so dull-like...
=)

After that,
apply white nail polish on the tip of your nails ...
The easy way to apply this is to
apply it horizontally...
You might need to apply more than a coat
for the darker nail polish...

Don't worry about getting out of shape
or whatever...
You can cover the imperfect part later...
=)

After that,
apply a sheer of glitter...
Not too thin but not too thick...
You would need to act fast at this part...
Put on glitter or the false pearl
on the white line and
cover up any imperfection that was made..

So, that's it for the four fingers...
=D
You just have to wait for it to dry up!!


And for the thumb,
Apply nail polish of your choice
and wait for it to dry...

After it dried,
draw a cross using thin brush
with black polish...
In my case,
I use marker...
=p
Well, I didn't have any black polish...
(/___\)
Fill in the other colour of your choice
in two boxes...
Like how I did...

When dry,
seal it up with a sheer of glitter...
And put on a decorative item of your choice...
Yeahh...
It smudge a little bit cuz
it hasn't really dry when I apply the glitter....
( 〉__〈 )
Sorrryyy...

So, that's it!!
Simple right??
Try to do it at home!!
=D

See ya next time....


**Coming up next is hairstyles for kids!!
Stay tuned!! ♥

Friday, 25 March 2011

MARBLE nail art tutorial

Well, I saw this tutorial at Youtube
and I thought,
why don't I share it with you guys?
So here is the post! =)

This tutorial is gonna be a really simple one...
Clumsy people like me could do it,
I'm sure that you guys can do wayyyy better!!
So here it goes...

You would need :
- several colours of nail polish
- a toothpick
- a little container with water inside
- nail polish remover
- some Q tip (就是棉花棒啦~)

First,
you gonna have to start off with clean nails ...
(Like "DUH"?? LOL~)

Get some clean water from your tab
using the container...
The container have to be a bit shallow
so that you can dip your finger in easily...


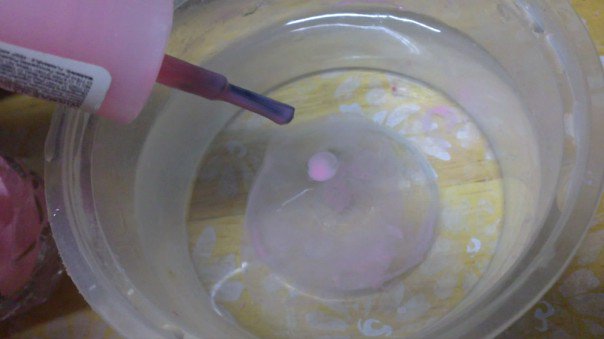
Choose a colour from your nail polishes,
then drip a drop in the water...
You just need a drop or two...
The colour I choose was soft pink...

Then, take another colour
and drip a drop in the middle
of the radius of the previous colour...
Like this,
I chose white...
You MUST act fast!!
If the nail polish had dried,
it would be hard to make pattern..

After that, you can choose to add more colour
or you can go straight to making pattern...
I skipped to add colours....
Instead, I went straight to make pattern...
I made a random one using toothpick..
If you want to do any special pattern like heart shape,
feel free to do so...
I was trying out so I thought I should just keep it simple..
=)

After finishing your pattern
which must be fast too,
you can dip your finger into the water
with your nail facing the base of container...
Like how I did on the picture above...

After you take your fingers out from water,
I believe that there are unnecessary nail polish
on your finger,
just clean it off with Q tip and nail polish remover...

Then ,
TADA!!
It is done!! =)
You can put some top coat to make the
nail appear more attractive!!

Until next time,
take care guys!! =)