
Well, I saw this tutorial at Youtube
and I thought,
why don't I share it with you guys?
So here is the post! =)
This tutorial is gonna be a really simple one...
Clumsy people like me could do it,
I'm sure that you guys can do wayyyy better!!
So here it goes...
You would need :
- several colours of nail polish
- a toothpick
- a little container with water inside
- nail polish remover
- some Q tip (就是棉花棒啦~)
First,
you gonna have to start off with clean nails ...
(Like "DUH"?? LOL~)
Get some clean water from your tab
using the container...
The container have to be a bit shallow
so that you can dip your finger in easily...

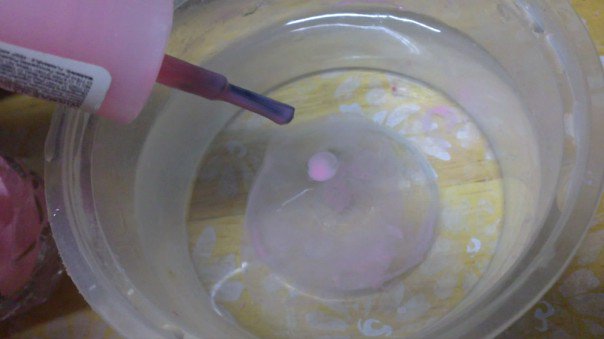
Choose a colour from your nail polishes,
then drip a drop in the water...
 You just need a drop or two...
The colour I choose was soft pink...
Then, take another colour
and drip a drop in the middle
of the radius of the previous colour...
Like this,
 I chose white...
You MUST act fast!!
If the nail polish had dried,
it would be hard to make pattern..
After that, you can choose to add more colour
or you can go straight to making pattern...
I skipped to add colours....
 Instead, I went straight to make pattern...
I made a random one using toothpick..
If you want to do any special pattern like heart shape,
feel free to do so...
I was trying out so I thought I should just keep it simple..
=)
 After finishing your pattern
which must be fast too,
you can dip your finger into the water
with your nail facing the base of container...
Like how I did on the picture above...
After you take your fingers out from water,
I believe that there are unnecessary nail polish
on your finger,
just clean it off with Q tip and nail polish remover...
Then ,
TADA!!
It is done!! =)
 You can put some top coat to make the
nail appear more attractive!!
Until next time,
take care guys!! =)
and I thought,
why don't I share it with you guys?
So here is the post! =)
This tutorial is gonna be a really simple one...
Clumsy people like me could do it,
I'm sure that you guys can do wayyyy better!!
So here it goes...
You would need :
- several colours of nail polish
- a toothpick
- a little container with water inside
- nail polish remover
- some Q tip (就是棉花棒啦~)
First,
you gonna have to start off with clean nails ...
(Like "DUH"?? LOL~)
Get some clean water from your tab
using the container...
The container have to be a bit shallow
so that you can dip your finger in easily...

Choose a colour from your nail polishes,
then drip a drop in the water...
 You just need a drop or two...
The colour I choose was soft pink...
Then, take another colour
and drip a drop in the middle
of the radius of the previous colour...
Like this,
 I chose white...
You MUST act fast!!
If the nail polish had dried,
it would be hard to make pattern..
After that, you can choose to add more colour
or you can go straight to making pattern...
I skipped to add colours....
 Instead, I went straight to make pattern...
I made a random one using toothpick..
If you want to do any special pattern like heart shape,
feel free to do so...
I was trying out so I thought I should just keep it simple..
=)
 After finishing your pattern
which must be fast too,
you can dip your finger into the water
with your nail facing the base of container...
Like how I did on the picture above...
After you take your fingers out from water,
I believe that there are unnecessary nail polish
on your finger,
just clean it off with Q tip and nail polish remover...
Then ,
TADA!!
It is done!! =)
 You can put some top coat to make the
nail appear more attractive!!
Until next time,
take care guys!! =)
No comments:
Post a Comment